This little 15 second video clip compresses a 4-5 step process every artist needs to go through in order to produce their work for sale, either as a standalone artwork or as a print of that artwork. You may also be designing and sketching a set of cards or larger replicable canvas prints.
The principles remain the same.
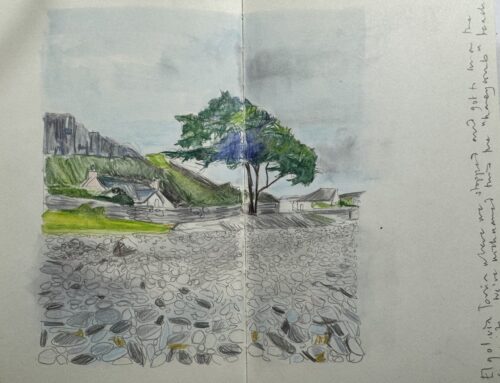
Here’s how I’ve gone from sketchbook to artwork to print for sale;
- You may have an initial idea, you may not. Your trusty sketchbook can help. Use it to explore what it is you are going to be putting together. Take your concept and explore it from all angles. Practise shape sketching, colour, what the image will contain, and explore what draws you to the theme in the first place. In my Swim your Swim series I wanted to convey playfulness but also loved exploring images of water as a concept. Get out into the open and sketch things first hand. Take photographs and build a mini visual scrapbook of ideas around your major themes. Sketch as much of the subject that you can so that you have a broad range of imagery options to choose from when you come to make your decisions about the artwork you are going to produce.
- Taking your sketchbook, which images did you enjoy putting together? Which bring you the most pleasure and are interesting to look at? If you are aiming to design and develop prints from it have you asked people around you which images they like? Now its time to consider which image will be made into that piece of artwork. Its worth remembering at this point, however, that not everyone is going to be a fan for of your work. Before you leap into your masterpiece though make sure you’ve considered the practicalities mentioned below. You can see how I turned my sketchbook into a series of paintings and the process I went through here
- Think about the finished size of your artwork as a print at this point. Not only this but consider the finished article in the hands of the person who buys what you put together. Remember what the end product will look like. People might like to add a frame to it and if you are offering a beveled mount to the print piece consider its final size, and cost to put together. The same can be said if you are designing for a set of cards. Don’t forget that your method of delivery may also be by post so taking into consideration how you will transport it and the size of envelope it will need to go in will need to be a mitigating factor. (What a way to kill a little of the artistic spirit to have to need to consider these things!)
- Produce your artwork. I would highly recommend that for your first foray into “art work to print” try and keep your imagery to smaller than A4 size. A4 is easy to scan, print, mount and post and relatively inexpensive to try.
- The quality of the print. Unless you have a good snap scanner and are prepared to practise with bags of patience and copious amounts of ink to get your print sets right (which can be expensive), it may be worth for the first few tries to find and access a good printer. The biggest challenge I have had are producing prints that are true to the colours of the original art work. I’d love to say there is a directory of printers that offer this service but it is a question of trial and error and testing who is a good fit for you as an artist. I’m based in South Yorkshire and I have an excellent printer based in Sheffield (contact me if you need his number!) specialising in art prints. I have to keep everything separated as on one occasion the original got muddled up with the print! It was that difficult to tell the original from the print! That is the effect you want to achieve.
- Consider the paper on which you want to print and again there is a vast array of papers dependent on the effects you want to achieve. Always try where possible to go for a heavier weight paper as for not too much extra money the quality will be visible.
- Choose your mounts. Remember you are selling to a broader audience. Keep the mounts neutral in colour as they match any type of frame once they reach their destination and can easily be changed by the owner to a mount of choice. I always tend to use antique white with a beveled edge.
- And finally don’t underestimate the postage process. Make sure you wrap your mounted print in a polythene bag so that a layer of protection exists between the envelope and artwork. Your envelope should be hard backed and self sealing for ease and there are many to choose from on the market. Ensure you also consider the cost of postage and the carrier of choice that will take the utmost care to get your bought print to its destination with speed and ease!
And last but not least and a challenge that every artist encounters is the sales and marketing process to get your prints out there as an artist. But this my friends will have to wait another day!
Emily x