Have you ever wondered how to draw a Christmas tree as easily as possible?
Whether through childhood, with your own children or as grown adults, there is something wondrous about the shiny splendour of an evergreen (or fabulous fake) tree adorned with the sacred family bauble relics and tinsel.
These are no ordinary trees albeit they follow the same drawing principles as those of the normal tree. Perhaps they are invested with extra qualities by the very nature that they form the symbol of the start of Christmas in our homes, a coming together, and place of gifting on Christmas morning.
The Christmas tree is far more interesting to draw than the standard tree.
But…
I remember getting extremely frustrated with Christmas trees in particular because I would focus too much, too long and in too much detail on parts of the tree in the vain hope it would all come together. I ended up with a drawing that only captured a small segment of my tree – and didn’t even look like a tree. It would fall off the page and in an effort to get things perfect I became confused with the odd shapes and perspectives of the tree’s branches. The whole picture looked a hot sticky mess of green and glitter!
It wasn’t until a few years ago that I stopped to take my own advice on how to draw a Christmas tree and stripped it of its complexity using a few logical steps. I have come to appreciate that the secret to success here lands firmly in the “less is more” camp.
After all, in my belief that everyone can draw, one must apply a little logic to creative proceedings.
I think that there are different stages to how to draw a Christmas tree and the same formula applies to whichever type of Christmas you’d like to draw, whether an illustrative, basic or more technically realistic one.
Table of Contents
Step 1. The overarching shape.
Where do we start with how to draw a Christmas tree?
Perhaps you may actually be sitting in front of yours right now reading this post!
Take a moment to look at it. What do you see? What are the things that jump out at you as you look at it? What shapes can you see – negative and positive? What is its colour. Forget that you are looking at a Christmas tree loaded with so many connotations. Try and see past it, gauging the shapes and shadows, as well as its depth and proportion. Are you looking up at your tree, down on it, straight at it? Is it fat, thin, bushy or tall….describe the tree in your mind’s eye.
Really see it.
Now go back and on your paper start with the overarching shape.
Let’s face it. The Christmas tree in the main is a triangular shape.
Remember, the top tip I always advocate when learning to draw? ALWAYS start with an overarching shape in your mind. Think about how best to capture the contour of an object on paper in its entirety. Imbibe the great teacher Kimon Nicolaides who in his brilliant book “The Natural Way to Draw” talks about imagining you are touching the edges of an object with your pencil!
Read more about the contour line here if this is a new concept to you to understand what I’m talking about.
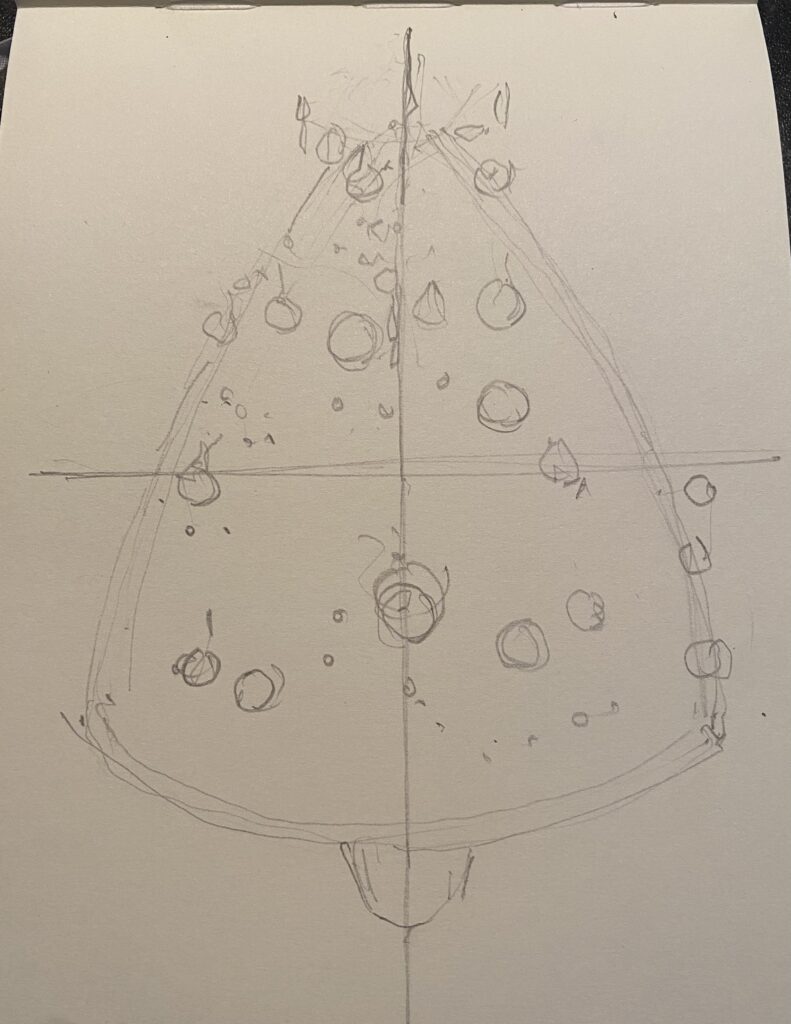
As you sketch out the overarching shape I want you to not worry yet about the branches or specific challenges of the detail. Just get the overarching shape down on paper. You are creating a frame for your drawing, and generic boundaries within which you can build your Christmas tree drawing. No falling off the page. You know exactly where you stand and are in control of your drawing.
My other top tip at this point is to make sure you leave plenty of space around your contour shape to allow for the eventual addition of irregular shaped branches or baubles. Don’t worry either with regards to how perfect this contour shape is. This first outline is there to reassure you about your drawing moving forward!
Step 2. Add your place markers!
….And this may surprise some of you to hear me go to this next step!
Place the baubles of your tree on your drawing next! This may look very odd, especially as they will hover in a blank triangle. Don’t worry if branches cover some of them – you can come back and work around and over them later. This next step is another great way in capturing how to draw a Christmas tree.
It does a variety of things.
1. It forces you to arrange your baubles in as accurate a way as you possibly can within the boundaries of your tree. Very quickly you will establish how you gauge the sizing of your bauble to fit them all in. You have the blank space and the boundary already in place to help you assess this relatively quickly.
2. Imagine your baubles are pins on a map. Start with the tip of the tree and the bottom branch layers. Then move in a circular manner plotting your baubles as you go!
Another approach is to pinpoint the largest baubles on the tree first and get those down on the page. Yet another approach is to split your triangle into quarters using a central line and plot the baubles into each of the segments. Find a way that works best for you to most accurately convey the positions of the baubles! (Your central line may also form your tree trunk, if it is visible.)
3. Plotting your baubles in this way will also help you anchor your sighting when you come to fill in the more finite detail of drawing the tree branches. You will need all the help you can get with portraying branches that to the eye may look a chaotic exercise in vamped up mark making! The baubles enable you to locate what you need to draw where.
As you step back and survey what you have drawn you already have a drawing that looks exactly as you want it to! A Christmas tree. (Or as one of the children referenced it…a very tasty triangular mushroom.)
Step 3. Adding tonal values and appreciating the marks you will be making.
At this point of your sketch you now need to shift your visual attention to the next stages in order to master the quest of how to draw a Christmas tree.
There will be many variations of shadow and tone within your Christmas tree. Using your baubles, aka the place markers as a guide, can you spot where the darker values exist first and shade them in – either in a darker green pencil or a darker gradient of pencil? You may even have enough of a tonal value to draw the shadows onto your drawing as an actual shape, still using your trees dressings as your guide.
Make sure that you keep the shading of your shadows as a smooth as possible using long measured strokes of equal pressure. Notice too how the very dark shadows are immediately juxtaposed by lighter tonal values of the trees branches, quite often illuminated by lighting.
Compare the smooth shading you make for the darker areas of your tree to the short thick marks on the paper you would use in contrast to create the sharp and pointed needles that radiate from the branches of your tree.
Stop for a moment and appreciate the variety of markings you are likely to make in the delivery of your picture. These include round reflective surfaces of your baubles, short spiky pine needles, the tree trunk, the jagged pointed edges of the fir trees branches that may protrude into your initial contour line as you build out the detailing.
Step 4. Adding the finite details.
…Here comes the most complicated part (in my opinion) of how to draw a Christmas tree!
The finer details. Namely the foliage and branches. This is more challenging not only because you have to add them but more so because you have to decide on how much you are going to add! Over egg this drawing and you can go too far. Not add enough you run the risk of leaving an unfinished drawing.
At this point one must make a decision as to the type of tree you are looking to convey. One with the finite detail or one that is more gestural, I.e less is more? This will also depend, for example, on what medium and choices of colour you finally use. Less can make more impact than labouring over the addition of too much detail.
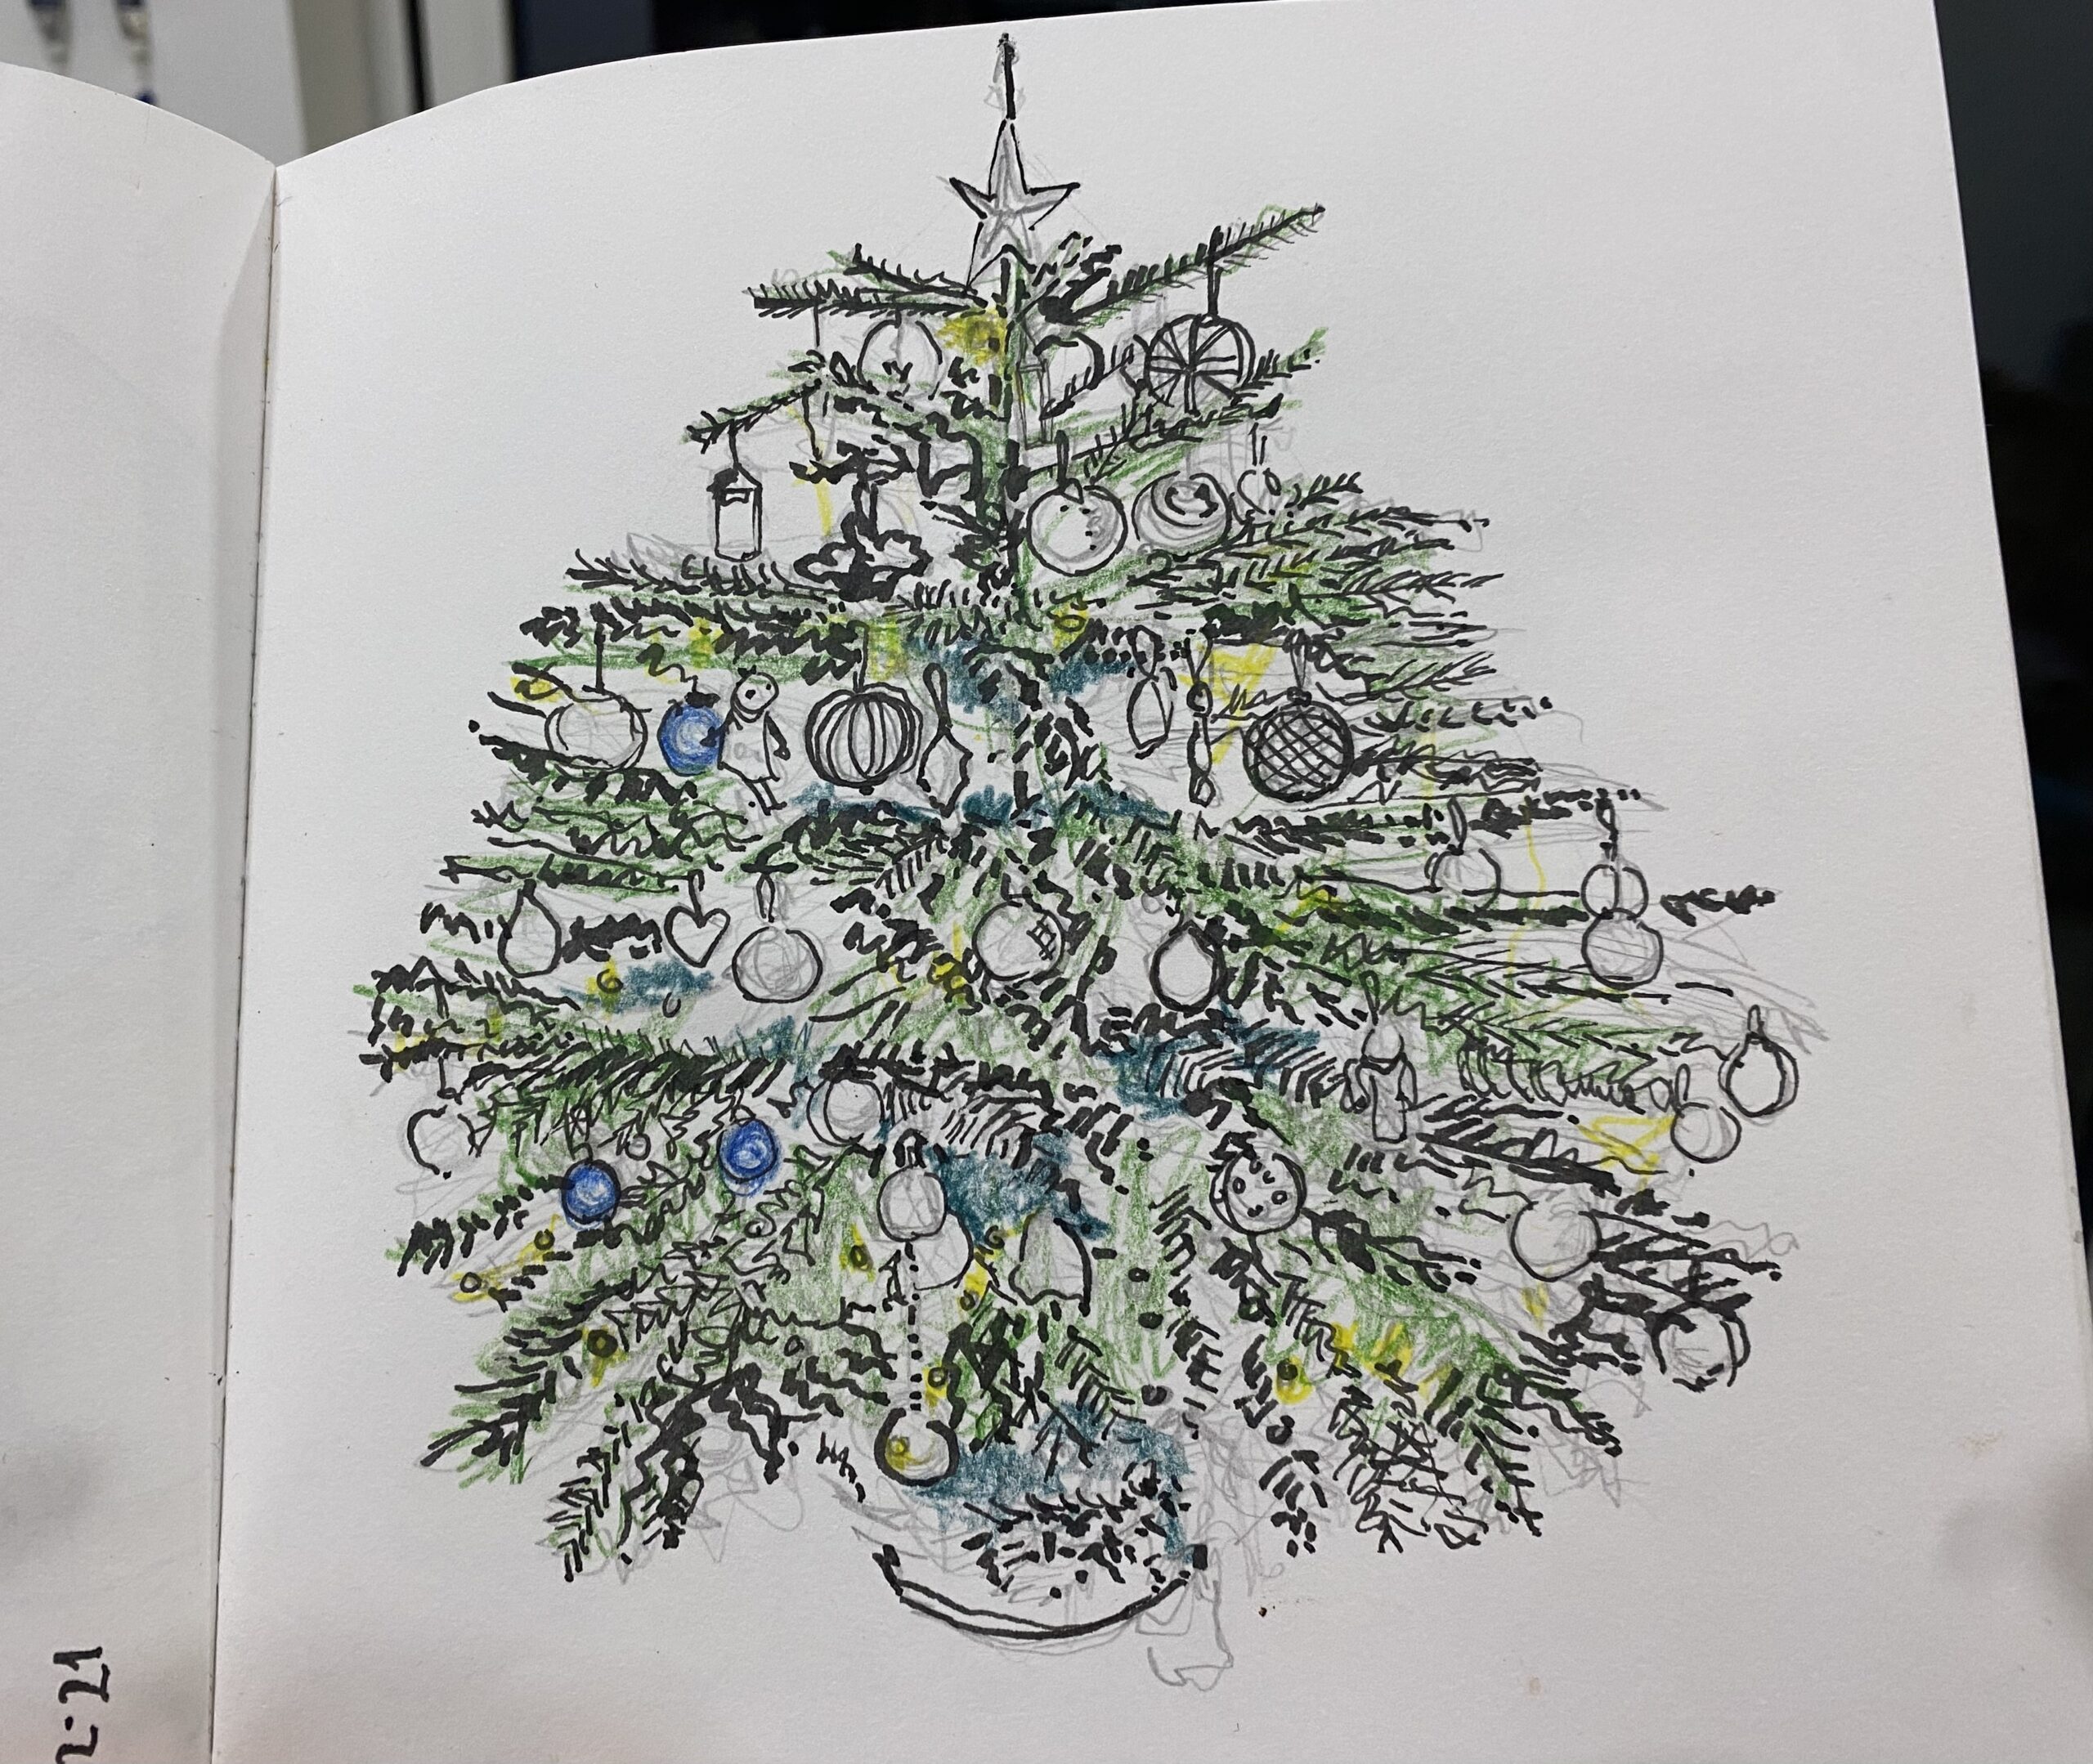
Take for example the illustration used in the major image of the blog post. An ink drawing. Everyone can see its a Christmas tree, but look closely you will see that the branch markings are simple stubby short lines. Did I capture every tree branch – no. But it’s not necessary.
Remember, your brain already associates what you have drawn as a Christmas tree. It already made that connection in the simple triangular line drawing with a pot at the bottom. Anyone looking at your drawing will make the cognitive connections necessary to have an impact! In theory, therefore, you need not add too much more detail.
In an overarching large sketch you need to make a decision as to whether you go with gestural or more detailed with your detailing. Both work surprisingly well. One of the only major differences lie in the fact that a more detailed drawing takes more time to complete.
If you are looking at attempting a more detailed drawing using drawing skills I’d recommend creating a cropped version of any sketch you look to draw zooming in on the details of a tree branch.
The reassuring thing here is that branches follow a logical order. The direction of the pine needles, for example, flow in a format and even more appealing is that pine needles are short sharp marks on a page. Practice on a spare piece of paper and play with the techniques you’d like to use in your final sketch.
Don’t forget too that using a sharp pencil to accentuate the points of the needles is also a great technique to adopt to accentuate or make some of your foliage stand out. Remember the smooth shading you may have completed in the steps above? Well, using contrasting marks supports highlight the differences and further emphasises the texture of your tree.
The next type of detailing you can add is to the baubles on the tree. Look to define any patterns or specific colours that you can see. Perhaps accentuate them in a bolder medium to make them stand out. Are they shiny and reflective or flat?
Adding colours to your work in different shades and varieties is now an option. Pick out where you can see reflections and brighter spots of colour in your drawing. Deepen the shades you have identified earlier on by adding hints of darker blues and greens in contrast to lighter shades of the same colour ranges.
Don’t forget the lights!
….And there we are. Those are the first few basic steps I would take in how to draw a Christmas Tree.
If you want to watch me do this in a tutorial check out the How to Draw a Christmas Tree lesson I have on my learning platform.
Make sure you’ve signed up to the Emily’s Notebook community!


