How to draw the human face? It is definitely a challenge!
It requires a whole new set of drawing techniques in addition to some of the basic ones. In this article I aim to break down the first phase of learning to draw the human face.
Here are my own personal challenges that I face when thinking about how to draw the human face;
- Capturing likeness. How to draw a human face in order to recognise who it is?
- Establishing accurate proportions.
- Making the human face look realistic and not 2D or cartoon like.
- Understanding the process to get it right every time in exactly the same way that I can draw anything anywhere and at anytime.
I regularly speak and teach on how you move from a 3D “live” image, translate it into a 2D drawing on your flat paper page and then transform your image into one that looks as if it is real!
Using the 4 basic drawing principles is essential with, as I have newly discovered, a pronounced emphasis on tone and shadow.
These drawing principles are thrown into stark relief further when it comes to drawing a human head or face. Drawing a 3D, believable image on a 2 dimensional surface is our ultimate aim.
I want to introduce a new type of thinking to our practice of drawing the human face that still follows the same formula we learned whilst processing the basic principles.
Firstly, we have become well versed in using the contour line to create the subject matter we are drawing.
With all drawing we start with the contour line which depicts the outside edge of a form. I write about this extensively here. The contour line alone, however, can never fully capture a 3 dimensional aspect. Hence why we use our other drawing principles to build upon what we see in order to add a dash of realism. Think of it as the difference between a cartoon character and a realistic image.
When it comes to drawing the human face, however, the concept of a line, even the contour seems woefully inadequate. We can draw the contour of a face easily enough but we need to work hard on developing the “reality” of 3D. This is what the ultimate aim of learning to draw the human face must be.
Luckily, the methodology we can employ to help us was discovered by Leonardo in the late 1400s who realised that it was the relationship of the light in the form of shadows on a face that would support in the depiction of it.
Chiaroscuro was born!
Chiaroscuro is the observation of light and shadow on form. Building an accurate depiction of the human face depends on light and dark spaces as well as the points at which the two meet. I will be exploring the the subject in greater depth in a later post.
If you have worked through the Scratch to Sketchbook teaching series we will now be moving away from a focal point solely on the contour line and into the realms of tone and shade as we draw. Before we do this, however, there are 3 core basic steps when starting to outline the human face that will lay a solid foundation.
Table of Contents
How to Draw a Human Face in 3 Steps!
Sculpt the shape of the head.
We start by capturing the whole and creating some boundaries to what we wish to draw. My first rule.
Before we start, let’s assess the shape we are looking at. Too often we assume that the human face is perfectly round when in actual fact the shape is very different. Take a moment to look at the image you are seeing and then work out how you are going to convey it on paper.
There is a basic step by step approach you can take when formulating your face as an outline contour that is consistent to all human head shapes.
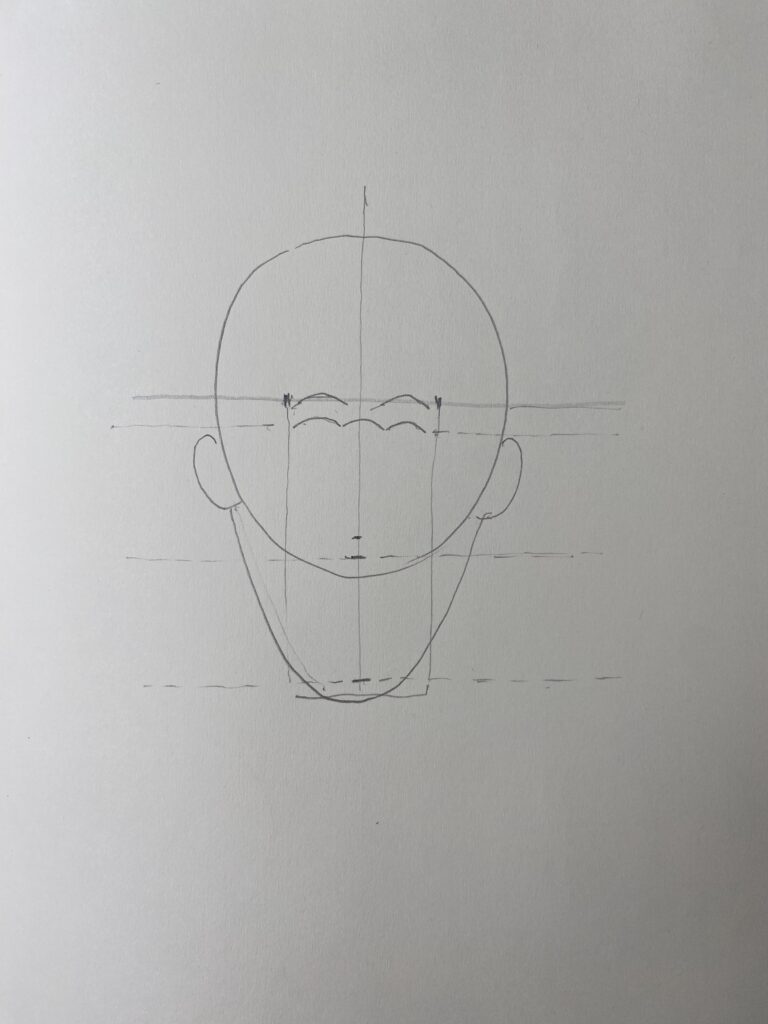
The main aim of this above diagram is to highlight the steps needed to get a basic line down on the page of a full front view of a face. You can adapt the sizes of the circles and rectangles as best you see fit. Ignore it’s robotic looking nature and focus instead on the step by step approach.
- Draw a circle. It can be rough and need not be perfect.
- Add a vertical and horizontal line separating the circle into quarters.
- On the horizontal line mark two equidistant lines on the page, midway in each half of the circle. These roughly represent the sphere of the eyes.
- Drop these lines lower than the circle and close them into a rectangle.
- Mark two eyebrow shapes at the point of the lines you marked in the top circle.
- Just below the eyebrow lines mark three semicircles of equal distance to one another. The middle equidistant semi circle corresponds to the distance needed to place the column of the nose.
- At the base of the circle make a horizontal mark.
- At the base of the rectangle make a mark – this will form the base of the chin.
- Draw dotted lines out from each of the marked areas. This delineates the proportions of the face that are consistent to studying the face.
- Add the ears in the middle section of the face.
This gives you an initial face shape. Keep your demarkations on the page as light as possible as you will, of course, be adapting the shape to the face you are aiming to draw.
We can always be confident of one thing when drawing the human face! The symmetry involved means that there is a general formula we can follow when we draw. Take a moment to practice this approach as much as possible.
In my How to Draw a Human Face tutorial I show you how I take the image of a face and work out how I transcribe this process to what I am drawing. I also explore how you would use this process for a 3/4 view or side perspective of the human face.
Once you have established the main shape and context include the hair, neck and shoulders.
Achieving the shape will support you work out the exact proportions of the face which I outline below.
Details will always come last once you have established the overarching contours and gesture of your image.
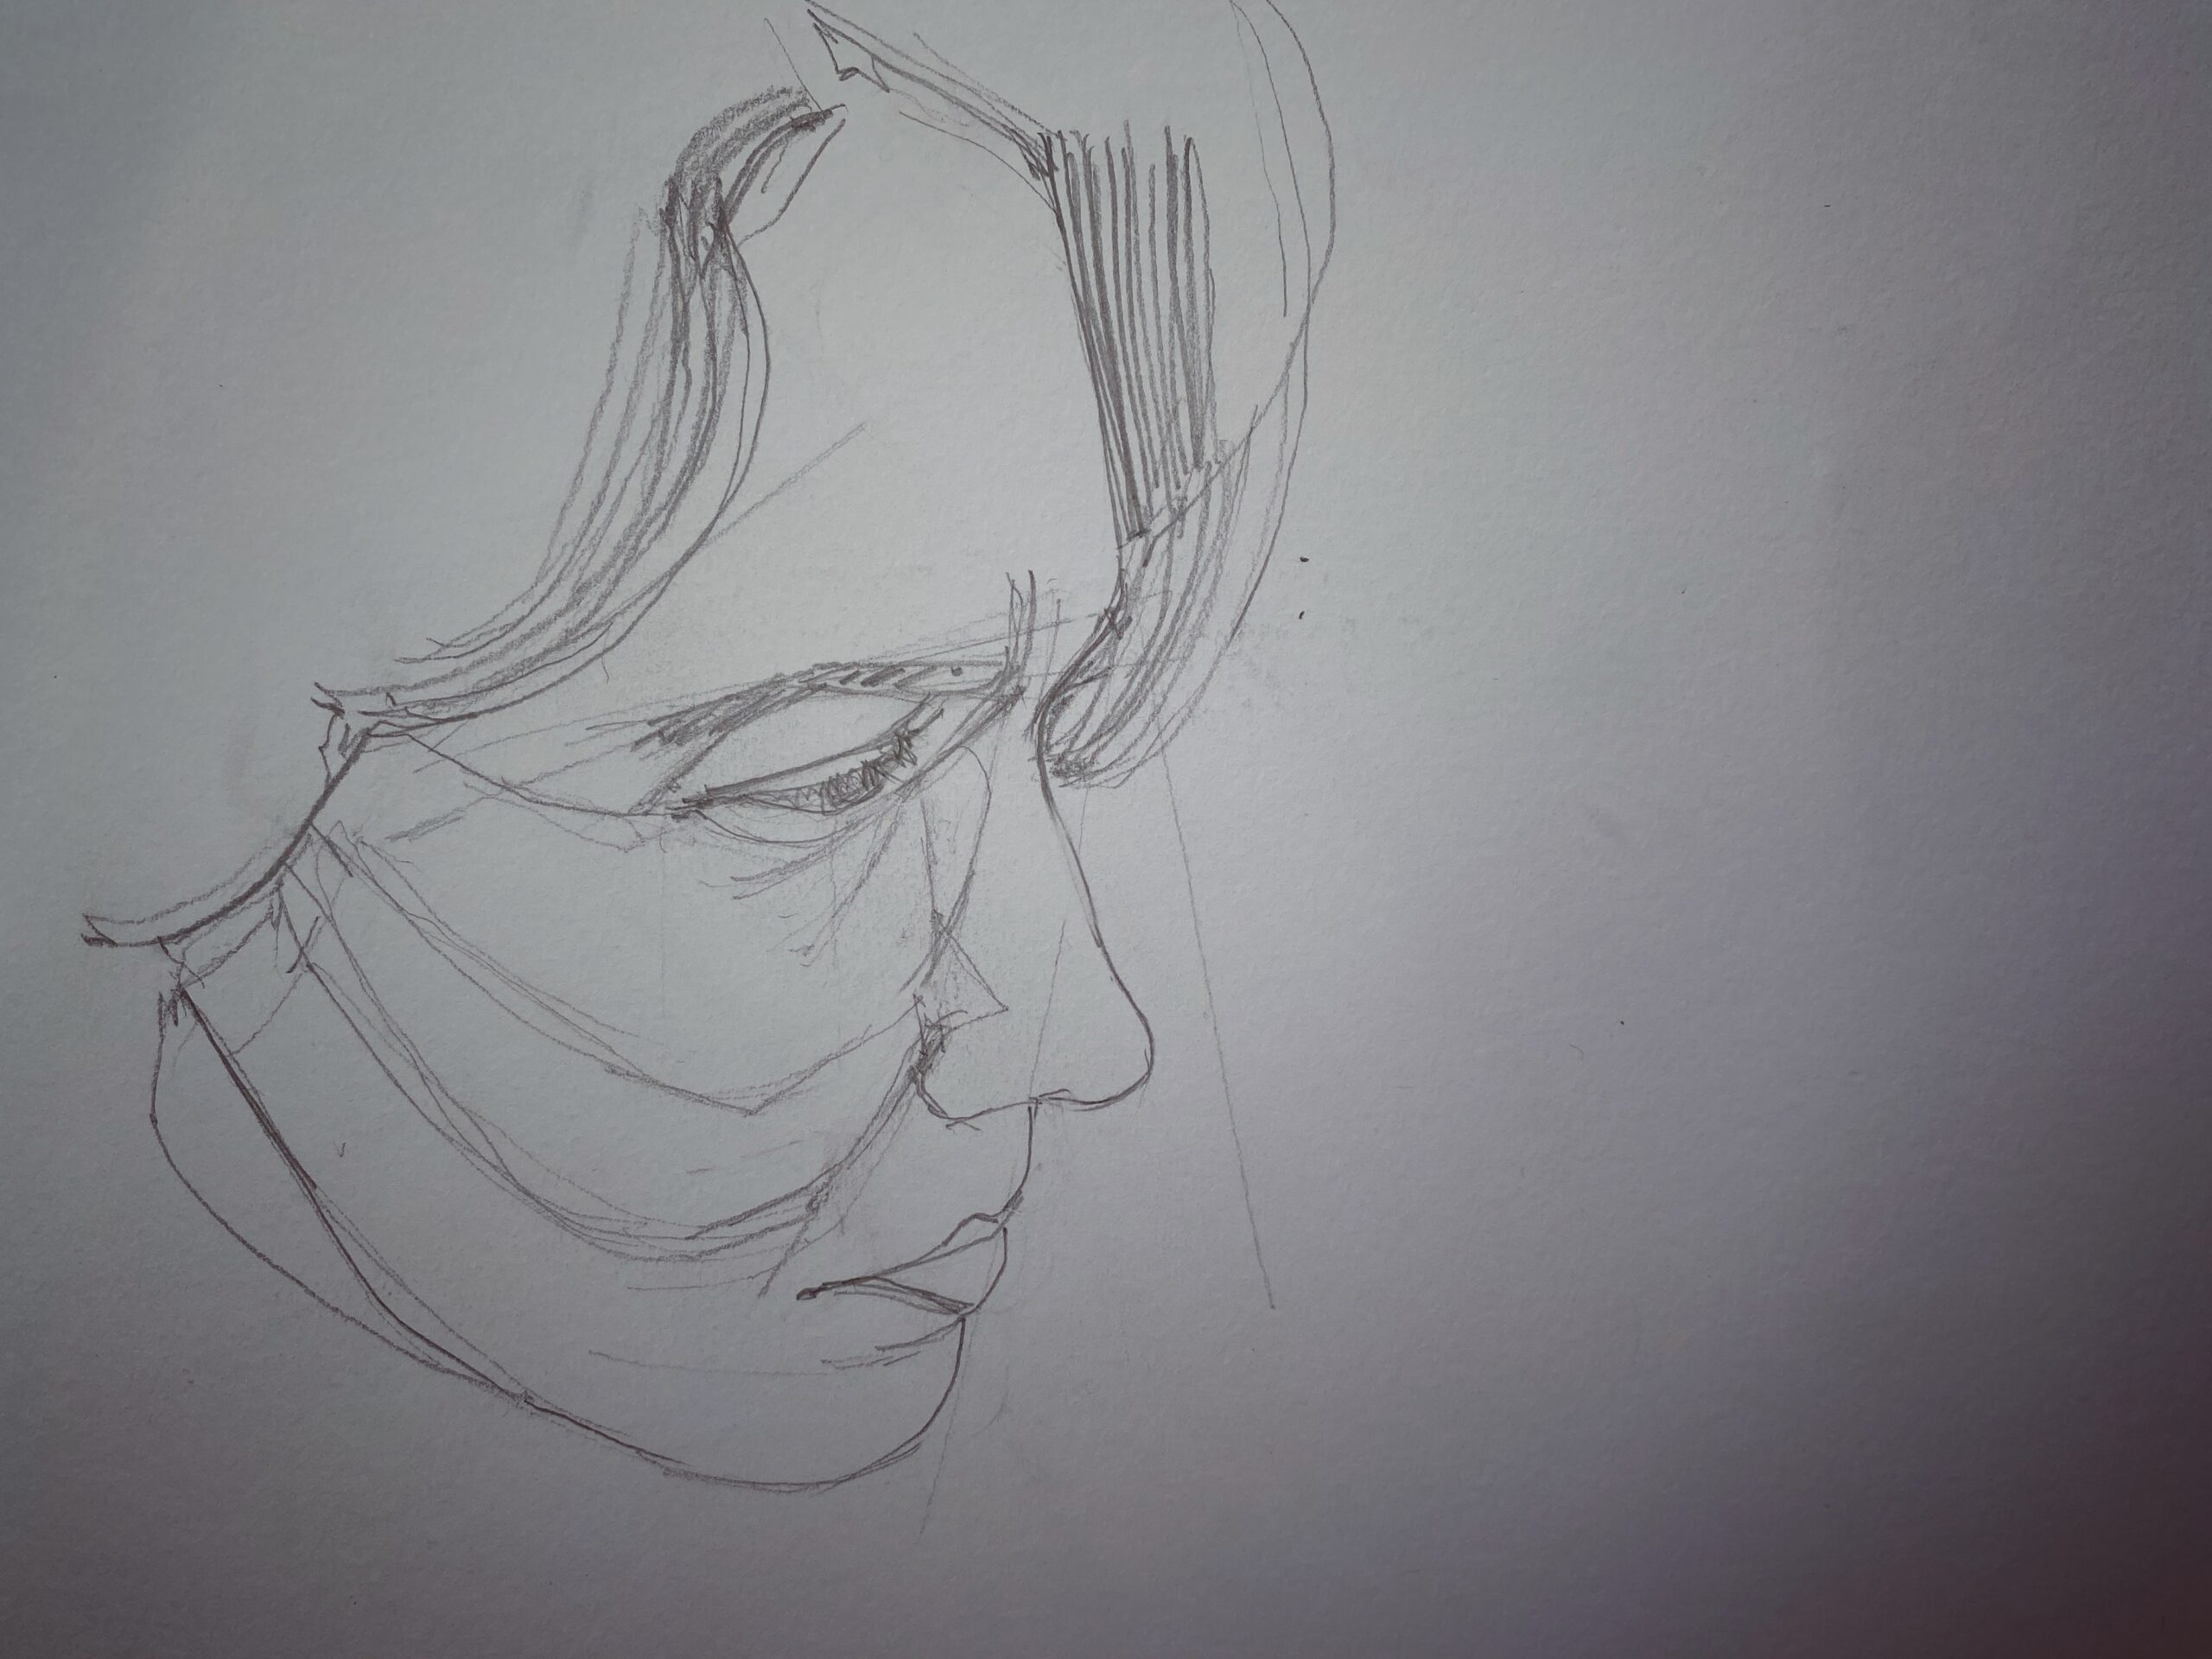
Focus on the gesture of the face.
Many of us fail to consider what the face we are drawing is doing. You may capture the above principles perfectly but you must now step it up a level by returning to the face in front of you and assessing the next layer of the drawing you wish to capture.
Gesture refers to how the face is “held” based on the emotion passing through it. Is there an emotion playing across the features of your face? Are they smiling, sad, cross? What are the angles of shoulders, or tilt of the head for example. We often fail to take into account these elements when considering facial features.
When we come to draw gesture we need to take a more refined and soft approach to simply getting a set of contour lines on a page. These should be drawn as a series of soft strokes that indicate the contour of the gesture pose and can be multiple in nature to start with whilst we gauge how to refine and adjust the ultimate line.
This is the point at which we breathe some spirit into our drawings. It is the gesture of a head that captures the likeness – a concept I struggle with readily!
Gesture is also important as it will indicate whether we need to employ foreshortening, the size and shape of the features as well as how they are arranged in your drawing. All of these elements will convey a particular gesture that reinforces the accuracy of the image you are drawing. For example a tilt of the head may indicate eyes that may not necessarily be in perfect proportion to the other.
Our job as artists is to be aware of every nuance, make focused observations and allow nothing to escape our attention. And if we don’t feel as if it looks right you can revisit the picture over and over again hunting for the clues to unlock the realism of the image you are seeking to convey.
These core steps will give you a road map with which to help!
Proportion for the face
In learning how to draw the human face, proportion screams for attention. It is a set formula that will support guide our activity. (It was used as early as the 1500s and is based on centuries of observation.) Facial features are well delineated and defined because they follow an anatomical structure consistent to the race of man.
Although head’s vary in size, they can all be adapted to a proportionate framework. This helps us simplify and use a visual “rule” when it comes to placement of necessary features. Womens and mens heads also tend to vary slightly. It is worth bearing in mind that a man’s head has a more structured jaw bone, chunkier neck, with an expansive range of features whilst a woman’s head has a softer more rounded form, thicker hair, and curved jawbone.
Back to my robotic looking head for a breakdown of how to draw the human face using some basic proportional guidelines!
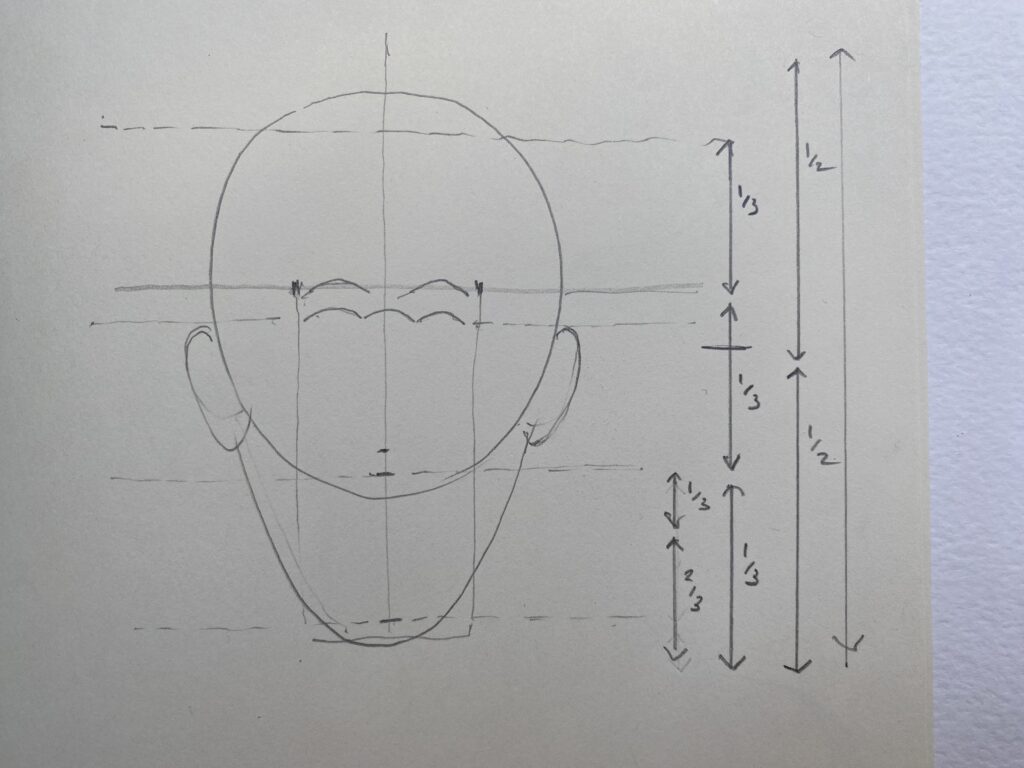
You begin a drawing with the standard proportions and then change and adapt as you go.
The face is essentially based on symmetry which follows a few simple rules;
- Split the face into proportional increments of a 1/2, 1/3rd and 2/3rds as I have done in the diagram above.
- To anchor the eyes in your drawing split your entire head into 2. The top of the head is the crown of the head (top of the skull). The eyes are placed at the midway point.
- Once your eyes are in place roughly mark out the 1/3rds in your image. The brow line should align with the top of the 1/3rd segment.
- The bottom of the nose is located 2/3rds down remembering that from hairline to brow, brow to nose, nose to chin are all equal
- The length of an ear is equidistant between eyebrow and bottom plane of the nose
- The space between the bottom of the nose and then the bottom of the chin can be apportioned as two measurements. 1/3rd and 2/3rds.
This is your starting point to support you anchor the basic proportions of your human face. You must now add the sprinkling of fairy dust to bring your image to life as opposed to a generic drawing of a face.
Now you have some beginning starting points with regards to how to draw the human face, my recommendation to you is to start by practicing the steps above. Become familiar with face shapes and how you set a basic shape on the page. Understand the anatomical significance of proportions and the natural law that governs them.
This will set a great foundation in place to enable you to start to capture the likeness of your human face.
If you’re interested in a range of exercises designed to support you move through these elements make sure you check out my mini course on How to Draw a Human Face which consists of a range of detailed modules taking you through logical steps in drawing the human face.
If you’re new to Emily’s Notebook make sure you also sign up to my regular newsletter updates, information about the weekly free live sessions and other resources all designed to get you drawing!